

In this post I will show you how to secure/hardening your Veeam Servers in addition to following the 3-2-1-1-0 security standard.
3: Maintain at least 3 copies of your data
By three copies, I mean that in addition to your primary data, you should also have at least two more backups of the same data.
2: Store the backups on 2 different media
Store one of the copies on internal hard disk drives and the other copy on removable storage media (tapes, external hard disk drives, cloud-storage, etc.)
1: Store at least 1 of the copies at an offsite location
One copy of the backups away from the physical location where the primary data and primary backup is located. If the company has no remote or branch office, an alternative could be saving a copy at a service provider in a private cloud or saving a copy in the public cloud.
1: Store at least 1 of the copies offline or immutable
Keep at least one copy of the backups offline (USB Drives, tapes ejected) or immutable (Linux with Veeam immutability or object storage with immutability).
0: Be sure to have verified backups without errors
Backups are only as good as they are being verified.
Hardening is about securing the infrastructure against attacks, by reducing its attack surface and thus eliminating as many risks as possible. One of the main measures in hardening is removing all non-essential software programs and utilities from the deployed Veeam components. While these components may offer useful features to the administrator, if they provide “back-door” access to the system, they must be removed during the hardening process.
Protecting your infrastructure successfully is all about understanding the current attack vectors; what and whom you are protecting, your Veeam infrastructure, against. If you know what and whom you are protecting against, makes it easier to take the correct countermeasures. One of those countermeasures is hardening.
Looking at the different Veeam Backup & Replication components you must protect the following components:
- Veeam Backup server
- User Accounts
- Backup repositories
- Backup data flows
Consider the Veeam Backup & Replication server to be the Number 1 target on your infrastructure and it should have very restricted access. As a general rule, the backup server is the single greatest target a hacker can claim on your network/infrastructure. Also the backup repositories which holds the backup files are a primary target.
There are two options to secure all the Veeam Servers. Let's see the details.
1 - Remove the servers from the domain you are protecting (the scope of this post). The servers will be in Workgroup
- Remove unused components
- SQL Server Local Database
- Roles and Users (Local Users, Restrict Users and Remove Veeam Servers from Domain)
- Hosts, NTP, Local GPOs, Firewall and Permissions
Pros
- Fast and easy to setup;
- Separates Veeam accounts from Domain privileged accounts;
- Does not rely on the environment it is meant to protect;
- No additional infrastructure servers required like: Domain Controllers, NTP and DNS;
- Can integrate Multi-Factor Authentication (MFA);
- Mostly used in small and medium enterprises.
Cons
- Large management overhead in large environments;
- No Kerberos communication when logging into a Workgroup server. Only NTLM;
- Harder to become compliant.
2 - Create a new domain with one-way trust to your protected domain (not the scope of this post).
- You can read more about this in Veeam article: https://bp.veeam.com/vbr/Security/Security_domains.html
- Remove unused components
- SQL Server Local Database
- All new Domain Infraestructure with DC, DNS and NTP servers
- Configure One-Way Trust between Production and Veeam domain
- Roles and Users (Restrict Users and Change Veeam Servers to new Domain)
Pros
- Easy to manage;
- One-click deactivation of a single AD account;
- Does not rely on the environment it is meant to protect;
- Secure Kerberos communication between different Veeam components and Group Policies;
- Can integrate Multi-Factor Authentication (MFA);
- Mostly used in large companies.
Cons
- It requires more time to prepare and installation/configuration;
- Will need extra infrastructure components (New Domain Controllers, DNS and NTP servers);
- Needs more knowledge to set it up correctly.
The Veeam Enterprise Manager service will not be described in this article. Only Veeam Backup & Replication and Veeam for Office 365 Backup (if installed on the same server). When using a WORKGROUP, you will need to have everything carefully documented because of management and compliance reasons. Every system needs to be configured independently per system with a local security policy, as well as users, permissions, etc. If you have multiple Veeam servers and users, this could become extremely cumbersome in larger environments.
Dependencies from all Veeam servers (including proxies, repositories, vCenter connections, etc.) from the domain you are protecting must be removed. This way the Veeam Availability Infrastructure does not rely on the environment it is meant to protect! Even if we have the Domain Controllers and Domain Admin accounts compromised, the backup servers will remain operational.
Step 1 - Remove Unused Components
Remove all non-essential software programs and utilities from the deployed Veeam components. While these programs may offer useful features to the administrator, if they provide "back-door" access to the system, they must be removed during the hardening process. Think about additional software like Web browsers, 7Zip, Java, Flash, Adobe reader and such. All parts which do not belong to the operating system or to active Veeam components, remove it.
When Veeam Enterprise Manager is not in use, uninstall it and remove it from your environment.
Step 2 - Secure and Migrate External SQL Server to Local SQL (skip, if it's already a secure local database)
The Backup & Replication configuration database stores credentials to connect to virtual servers and other systems (like vCenter, Agents and Repositories) in the backup & replication infrastructure. All passwords stored in the database are encrypted. However, a user with administrator privileges on the backup server can decrypt the passwords, which presents a very potential threat. If you already have a Local SQL Secure in the Veeam server you can skip this step.
The following database query returns all Veeam credentials encrypted:
SELECT TOP (1000) [id]
      ,[user_name]
      ,[password]
      ,[usn]
      ,[description]
      ,[visible]
      ,[change_time_utc]
  FROM [VeeamBackup].[dbo].[Credentials]
And the following commands decrypts the passwords, in this case the enconded password "XXXXXX" (simple as that):
Add-Type -Path "C:\Program Files\Veeam\Backup and Replication\Backup\Veeam.Backup.Common.dll"
$encoded='XXXXXXX'
[Veeam.Backup.Common.ProtectedStorage]::GetLocalString($encoded)
PASSWORD_CLEAR_TEXT
Now imagine that your SQL Server is compromised and you have the vCenter credential exposed (too many devastation)! That's why it's better to migrate the SQL Database to a server in Workgroup (domain independent) with SQL Authentication only. I will migrate the database to the Veeam Server itself, so that it does not depend on other servers.
We can continue to use a SQL Server outside of the Veeam server, however this server must be in Workgroup and use local SQL accounts when connecting to the Veeam Server. In this scenario, we are not interested in high availability with AlwaysOn or similar, what we intend is to have Veeam database secure.
Step 2.1 - Prepare Veeam Server for SQL Installation
- Prepare downtime of the Veeam Server and it's Backups/Restores;
- Add at least more 8GB memory and 2vCPU to the existing Veeam server resources. We will block SQL Services to use a maximum 8GB RAM or to not use more than 40% of the total memory.
Step 2.2 - Install SQL Server (In the near future, Veeam 12 will support PostgreSQL)
- Install SQL Server 2016/2017/2019 Standard or Express on the Veeam Server;
- Be careful that databases above 10GB, Standard license or higher is required. If the DB is less than 10GB you can use SQL Express, but it is not recommended;
- With Veeam 12 it will be possible to migrate SQL Server to PostgreSQL database and we don't have to worry about licenses.
Step 2.3 - Restrict user access to the database
- Create a local SQL account for Veeam with complex password. Remove other local/domain users/groups from SQL Server (if any)
Step 2.4 - Updates
- Update SQL Server with the last Cumulative Update;
- Restart the server if necessary.
Step 2.5 - Migrate Veeam Database from external SQL server
- Stop and Disable all Veeam jobs;
- Backup all Veeam Database configurations to a simple location (Default Backup repository for instance). We will only use this backup for migration and the we will delete these files later.

- Connect to the new Local SQL Server Instance running the following command:
- %PROGRAMFILES%\Common Files\Veeam\Backup and Replication\DBConfig

- Specify the name of the database to be created, the name of the server and instance (SERVER\INSTANCE). If the database does not exist, the user must have permissions to create databases. If this is not the case, the Database Administrator can create a clean database and add the local Veeam SQL account as the db_owner of this database. Another possible way, is to temporarily put our local user as sysadmin until Veeam is migrated. Then we add the user as db_owner and remove the sysadmin.

- Several checks will be verified. If everything is correct, click Next

- Wait until the operation is performed successfully

- When you open Veeam Backup & Replication, it will be empty (don't worry). Now we need to restore all our settings, including Job definitions, Job Logs, Repositories, Proxies, History, etc.

- To restore, go to configurations menu and select Restore

- Select Migrate option

- Select the backup file that we made earlier with the password (if exists)
- Select the new SQL Server Local Database as "Target database"
- Choose the following restore parameters:

- Take a coffee break and wait a few minutes until the process is complete. In my case it took about 35 minutes to restore 12GB of data


- Remove the SQL local Veeam account from SQL Server sysadmin. It just need to be db_owner of the veeam database;
- If Veeam services give an error connecting to local SQL Server, it may be necessary to install the Feature Pack of the SQL SMO (Shared Management Objects) and SQL CLR (Common Language Runtime);
- Block Windows Firewall port 1433/TCP Inbound and Outbound because our SQL Server is local;
- Start all services (if not already) and Enable all Jobs. On the Veeam console check if everything is up and running. Verify that everything is operational by letting Veeam run for a few days before moving on to the next step.
The next Veeam version v12 comes with the possibility to migrate to PostgreSQL. This way, the SQL Server licensing problem is solved. PostgreSQL is also the default database when doing a clean install of Veeam 12.
Step 3 - Local Accounts, Restrict Users and Remove Veeam Servers from Domain
Step 3.1 - Create Local Accounts
- Check that there are no service accounts, task schedulers, Scripts or Reports with domain users accounts on all Veeam servers. If you have, change the user to a local account with only the needed privileges;
- Change the password of the local account Administrator. Use complex passwords with 12 chars minimum.
- If you have proxy servers, you need to use the Administrator account to connect to Veeam server.
- https://www.veeam.com/kb4185
- Change the credential on the Veeam server regarding the Proxies (if you have on seperate server)

- Remove the old domain account from the local administrators on the proxy servers (if you have on seperate server);
- On the Veeam server, create nominal accounts (one for each Backup Administrator) with strong and complex passwords. These accounts only have access to RDP (Remote Desktop Users). See note below;
- On the Veeam server, rename the Local Administrator and assign a strong and complex password;
- NOTE: If you have a Jump Server or a VDI that users usually use, you can uninstall the console on the Veeam Server, disable the RDP 3389/TCP service/Port and install the console in the Jump Server/VDI. They can access Veeam by entering the credentials of the local users. In Veeam v12 the best practices is to disable RDP in all Veeam Servers (Use the console instead);
- Associate these local accounts with Permissions/Roles in Veeam (no more than three Veaam Backup Administrators users)

Step 3.2 - Remove Proxy/Tape Servers from Domain (if components are separate)
- Remove the Proxies and Tape servers from domain and assign Workgroup for instance;
- Since a reboot is pending, you can install the latest updates and patches on backup infrastructure servers to minimize the risk of exploiting guest OS vulnerabilities by attackers;
- After restart, cleanup the Active Directory, old domain profiles and SIDs on the server;
- On the Veeam console check if everything up and running with the proxy or tape server. Verify that everything is operational by letting Veeam run a few jobs using this proxy/tape server before moving on to the next step.
Step 3.3 - Remove Veeam Server from Domain
- Remove the server from domain and assign Workgroup for instance;
- Since a reboot is pending, you can install the latest updates and patches on backup infrastructure servers to minimize the risk of exploiting guest OS vulnerabilities by attackers;
- After restart, cleanup the Active Directory, old domain profiles and SIDs on the server;
- On the Veeam console check if everything up and running. Verify that you can connect to the Proxies and Repositories.
Step 3.4 - If you have Veeam for Office 365 installed on the same Servers
- If you remove from domain proxies used by Veeam O365, you need to delete the proxy and re-install it;
- If you are using CIFS to connect to Veeam O365 Repository, it is necessary that the repositories be accessed by iSCSI, because CIFS implies that the proxies are in the domain with the Computer account and have access to the Share (due to the SYSTEM account of the Veeam O365). If the repository is in iSCSI (recommended by Veeam) it is only necessary to change the Proxy access account.
- Take into account that migrate from CIFS to iSCSI can take a long time depending the repository size and Storage configurations
- Check the step-by-step provided by Veeam: https://www.veeam.com/kb2649
- If you have this error when adding more users to backup after migration, you need to rebuild Jobs, repositories and Connection to O365 tenant. So be aware of this scenario when removing O365 server from domain.

- You can always use Powershell GetVBOjob command to get all the Job configurations, so you can restore from it.
Step 3.5 - If you have NetApp as Repository joined to the Domain
- For the environemt to be isolated from the Domain that is meant to protect, you need to remove the Storage NetApp from the domain as well (if you have it on domain);
- Remove it from the domain (be careful and check if nothing is using the Storage besides Veeam like shares using CIFS);
- Create a new local user in NetApp using the following command with SSH:
cifs users-and-groups local-user create -user-name data_admin -is-account-disabled false -vserver vserver1 -description "Data Administrator"
- Give that user permissions on the share and in security NTFS. This is the only user with read/write permissions on the Veeam backup share;
- Add this new user in Veeam repository and delete the old one.
Step 3.6 - If you have HPE StoreOnce as Repository joined to the Domain
- For the environemt to be isolated
from the Domain that is meant to protect, you need to remove the Appliance HPE StoreOnce from the domain as well (if you have it on domain);
- Remove it from the domain (be careful and check if nothing is using the Storage besides Veeam like shares using CIFS);
- Create a new local user in StoreOnce;
- Give that user permissions on the share and in security NTFS. This is the only user with read/write permissions on the Veeam backup share;
- Add this new user in Veeam repository and delete the old one.
- NOTE: The next StoreOnce Firmware 4.3.2 will Support dual authorization that requires approval of two separate users to authorize execution of an operation. This feature protects data loss caused by malicious actions, such as a ransomware attack.
Step 4 - Configure Hosts File, NTP, Local GPOs, Firewall and Permissions
Step 4.1 - Host files
- We don't want to depend of the DNS Servers, so we can populate the Hosts file with our Veeam IP addresses. Insert the IPs and names of the proxies, clients/agents and vCenter/ESXi on the hosts of all veeam servers, in c:\windows\system32\drivers\etc\hosts:
X.X.X.Y VEEAMP1.domain.local VEEAMP1
X.X.X.Z VEEAMP2.domain.local VEEAMP2
X.X.W.K VEEAMT1.domain.local VEEAMT1
Y.Y.Y.Y VCENTER.domain.local VCENTER
Step 4.2 - NTP
- We will not be syncing with our domain and we don't need a dedicated NTP Server. So, you can use my previous NTP Post where you can define and configure NTP settings on Veeam Hosts.
- Change the DNS/IP Addresses to use an external server of your country/choice (Firewall Outbound Port 123/UDP)
Step 4.3 - Local GPOs (Group Policies)
Since we don't have GPOs for Firewall definitions, we have to create exception rules, see in step 4.4 the necessary firewall rules (depending on each type of Veeam Role installed). We can create some local GPO to protect/secure our Veeam servers:
- Rename Administrator account (only on the primary server because in the proxies we need to have the Administrator account name):

- Disable Guest account

- Account lockouts (if the account is locked out, the Backups are not interrupted)
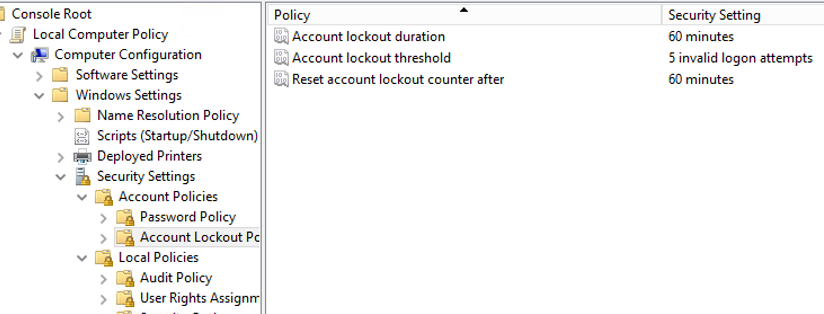
- Audits enabled

- The policies must be created in all Veeam servers.
Step 4.4 - Local Firewall
Since we don't have Domain GPOs to open the Windows Firewall ports needed in all Veeam servers, make sure you have the correct Ports opened or you may have communication issues.
- Firewall on all Veeam Servers (depending on the Roles/Agents installed):
22/TCP - SSH (Access to Linux Servers for granular backups)
25/587/TCP - SMTP/SMTPS (To send emails)
135/TCP - RPC/WMI5636 (Access to Windows Servers for granular backups)
161/UDP - SNMP (To send Alerts if necessary)
445/TCP - SMB (Access to Windows Servers for granular backups)
80/443/TCP - HTTP/HTTPS (If you have Enterprise Veeam or Veeam Office 365 installed)
902/TCP - ESXi (Data transfer to ESXi host)
2049/TCP - NFS (Transmission to the target NFS share)
6160/TCP - VEEAM (Installer)
6161/TCP - VEEAM (vPower NFS)
6162/TCP - VEEAM (Transport)
6164/TCP - VEEAM (WAN Accelerator)
6170/TCP - VEEAM (Mount Server)
6166/TCP - VEEAM (Tape Proxy)
6168/TCP - VEEAM (Cloud Gateway)
6190/TCP - VEEAM (Guest interaction proxy)
6290/TCP - VEEAM (Guest interaction proxy)
6210/TCP - VEEAM (VSS Integration Service)
6211/TCP - VEEAM (Storage Snapshots, VSS provider)
9191/TCP - VEEAM (Veeam Backup for Microsoft 365 components)
9193/TCP - VEEAM (Office 365 Proxy Server)
9380/TCP - VEEAM (Distribution Service)
9387/TCP - VEEAM (HPE StoreOnce command port)
9388/TCP - VEEAM (HPE StoreOnce data port)
9401/TCP - VEEAM (Mount Backup Server)
10005/TCP - VEEAM (Agent Windows)
10006/TCP - VEEAM (Agent Linux/MAC)
2500-3300/TCP - VEEAM (Transmission channels for backup/replication/copy jobs)
49152-65535/TCP - VEEAM (Dynamic RPC port range)
- Restrict or block ICMP (ping) from certain/all networks;
- It's best practices to block RDP to Veeam Servers and access the Veeam using the console;
- Block SQL port (default 1433/TCP) to Inbound and Outbound (SQL Server is local);
- Permit port SNMP (161-162/UDP) and use SNMPv2 with a non standard community string or SNMPv3 with a complex password so you can have alerts in your monitoring system.
You can view all the Firewall ports in the following Veeam articles:
Step 4.5 - Permissions
Use the principle of least privilege. Provide the minimal privilege needed for some operation to occur. An attacker who gained high-privilege access to backup infrastructure servers can get credentials of user accounts and compromise other systems in your environment. Make sure that all accounts have a specific role and that they are added to that specific group. Containment to keep the attackers from moving around too easily. Some standard measures and policies are:
- Do not use normal user accounts for admin access, reducing incidents and accidents;
- Give every Veeam admin his own nominal account or add their admin account to the appropriate security group within Veeam, for traceability and easy adding and removal;
- Only give access to what is needed for the job;
- Limit users who can log in using Remote Desktop and/or Veeam Backup Console (recommended);
- Add 2-factor authentication to highly valuable assets (version Veeam v12 will support MFA in the console);
- Monitor your accounts for suspicious activity;
- Permissions required for Veeam, Hosts, Virtualization and Guest processing
Step 4.5.1 - vCenter Permissions (if any)
If VMware vCenter Server is added to the backup infrastructure, an
account with reduced permissions can be used. Use the minimum
permissions for your use-case. For
example Hot-Add backup requires the "delta disk" permission. You can
also consider elevating permissions for restores.
Backup proxies must
be considered the target for compromise. During backup, proxies obtain
from the backup server credentials required to access virtual
infrastructure servers. A person having administrator privileges on a
backup proxy can intercept the credentials and use them to access the
virtual infrastructure.
Best practices:
- Do not use administrator@vsphere.local to connect Veeam to vCenter (User with too many/all privileges);
- Do not use users from domain to connect Veeam to vCenter (If the domain is compromised, they have access to vCenter);
- Create a new vSphere local account withe only the permissions required to connect Veeam to vCenter;
- If possible, remove vCenter from domain.
The process is very straithforward to remove vCenter from domain:
- Create local accounts in vCenter like USER@vsphere.local;
- Add permissions to the new users like the ones in USER@DOMAIN.XXX (be careful with the inherit permissions);
- Change the administrator@vsphere.local password regulary and never use it for services like Veeam;
- Create new user like VEEAM@vsphere.local with a strong and complex password (this is the user that you are going to use in Veeam to communicate with vCenter);
- Add the permissions below to user VEEAM@vsphere.local;
- Remove vCenter from domain (there is no downtime for the ESXi Hosts).
The permissions required for VEEAM@vsphere.local user are in this table:

To make this process simpler, the folllowing Powershell Script will add the permissions required for the user Veeam in vCenter (use PowerCLI to run the Script):
$VeeamPrivileges = @(
    'System.Anonymous',
    'System.View',
    'System.Read',
    'Global.ManageCustomFields',
    'Global.SetCustomField',
    'Global.LogEvent',
    'Global.Licenses',
    'Global.Settings',
    'Global.DisableMethods',
    'Global.EnableMethods',
    'Folder.Create',
    'Folder.Delete',
    'Datastore.Browse',
    'Datastore.DeleteFile',
    'Datastore.FileManagement',
    'Datastore.AllocateSpace',
    'Datastore.Config',
    'Network.Config',
    'Network.Assign',
    'DVPortgroup.Create',
    'DVPortgroup.Modify',
    'DVPortgroup.Delete',
    'Host.Config.Maintenance',
    'Host.Config.Storage',
    'Host.Config.Network',
    'Host.Config.AdvancedConfig',
    'Host.Config.Patch',
    'VirtualMachine.Inventory.Create',
    'VirtualMachine.Inventory.Register',
    'VirtualMachine.Inventory.Delete',
    'VirtualMachine.Inventory.Unregister',
    'VirtualMachine.Interact.PowerOn',
    'VirtualMachine.Interact.PowerOff',
    'VirtualMachine.Interact.Suspend',
    'VirtualMachine.Interact.ConsoleInteract',
    'VirtualMachine.Interact.DeviceConnection',
    'VirtualMachine.Interact.SetCDMedia',
    'VirtualMachine.Interact.SetFloppyMedia',
    'VirtualMachine.Interact.GuestControl',
    'VirtualMachine.GuestOperations.Query',
    'VirtualMachine.GuestOperations.Modify',
    'VirtualMachine.GuestOperations.Execute',
    'VirtualMachine.Config.Rename',
    'VirtualMachine.Config.AddExistingDisk',
    'VirtualMachine.Config.AddNewDisk',
    'VirtualMachine.Config.Annotation',
    'VirtualMachine.Config.RemoveDisk',
    'VirtualMachine.Config.RawDevice',
    'VirtualMachine.Config.AddRemoveDevice',
    'VirtualMachine.Config.EditDevice',
    'VirtualMachine.Config.Settings',
    'VirtualMachine.Config.Resource',
    'VirtualMachine.Config.AdvancedConfig',
    'VirtualMachine.Config.DiskLease',
    'VirtualMachine.Config.DiskExtend',
    'VirtualMachine.Config.ChangeTracking',
    'VirtualMachine.State.CreateSnapshot',
    'VirtualMachine.State.RevertToSnapshot',
    'VirtualMachine.State.RemoveSnapshot',
    'VirtualMachine.State.RenameSnapshot',
    'VirtualMachine.Provisioning.MarkAsTemplate',
    'VirtualMachine.Provisioning.MarkAsVM',
    'VirtualMachine.Provisioning.DiskRandomAccess',
    'VirtualMachine.Provisioning.DiskRandomRead',
    'VirtualMachine.Provisioning.GetVmFiles',
    'VirtualMachine.Provisioning.PutVmFiles',
    'Resource.AssignVMToPool',
    'Resource.CreatePool',
    'Resource.DeletePool',
    'Resource.HotMigrate',
    'Resource.ColdMigrate',
    'Extension.Register',
    'Extension.Unregister',
    'VApp.AssignVM',
    'VApp.AssignResourcePool',
    'VApp.Unregister',
    'StoragePod.Config',
    'Cryptographer.Access',
    'Cryptographer.EncryptNew',
    'Cryptographer.Encrypt',
    'Cryptographer.Migrate',
    'Cryptographer.AddDisk',
    'InventoryService.Tagging.AttachTag',
    'StorageProfile.Update',
    'StorageProfile.View')

Add-PSSnapin VMware.VimAutomation.Core -ea "SilentlyContinue"
Set-PowerCLIConfiguration -InvalidCertificateAction Ignore -Confirm:$false | Out-Null
$vCenterServer = Read-Host "Enter vCenter Server host name (DNS with FQDN or IP address)"
$vCenterUser = Read-Host "Enter your username (DOMAIN\User or user@domain.com)"
$vCenterUserPassword = Read-Host "Enter your password" -AsSecureString:$true
$Credentials = New-Object System.Management.Automation.PSCredential -ArgumentList $vCenterUser,$vCenterUserPassword
Connect-VIServer -Server $vCenterServer -Credential $Credentials | Out-Null
Write-Host "Connected to your vCenter server $vCenterServer" -ForegroundColor Green
$NewRole = Read-Host "Enter your desired name for the new vCenter role for Veeam"
Write-Host "Your new vCenter role will be named $NewRole" -ForegroundColor Green
New-VIRole -Name $NewRole -Privilege (Get-VIPrivilege -Id $VeeamPrivileges) | Out-Null
Disconnect-VIServer -Confirm:$false
Step 4.5.2 - HPE StoreOnce Permissions (if any)
Best practices:
- Create a single user with permissions in the StoreOnce store; One different user for each store;
- Do not add public access do the Store;
- Add this user in Veeam when connecting to StoreOnce Store repository:


Conclusion
In this way, we can isolate all Veeam servers and databases so that we always have backups isolated from the Production environment we want to protect.
Besides all that I have written, you can protect the systems with MFA (there are many software for integration with windows servers, for instance, DUO) and MFA for Veeam console will arrive in version 12. And never forget the most important thing, the rule 3-2-1-1-0 that everyone must follow.
In the near future, I will demonstrate how to upgrade from Veeam 11a to Veeam 12 (and migrate SQL Server to PostgreSQL) with HPE StoreOnce immutability integrated (Firmware 4.3.2 comming this Summer) and some of the best new features related to security. For now, the best option for immutability is to use a local Veeam Linux Server for repository, S3 Object or Azure Blobs Storage.
With all this been set, all you can do is pointing a Webcam in the datacenter to your console servers :D
Let me know if you have any other suggestions to improve the security of Veeam Backup servers.
See you in the next article!
No comments:
Post a Comment